Findings notifications
Integrate Glasstrail into your existing monitoring tools, and get notified when there are new issues, risks, or changes to your inventory.
In this article...
Notifications overview
- Create a notification to get informed of new findings based on severity, type, or scanned entity
- Notifications will be sent after every scan
- Notifications can be sent via e-mail, webhooks or using cURL
How to create a new notification
Follow the steps below to create a new notification and specify the findings you want to be notified about.
It is best to set up notifications after your first scan else you risk generating a large number of notifications.
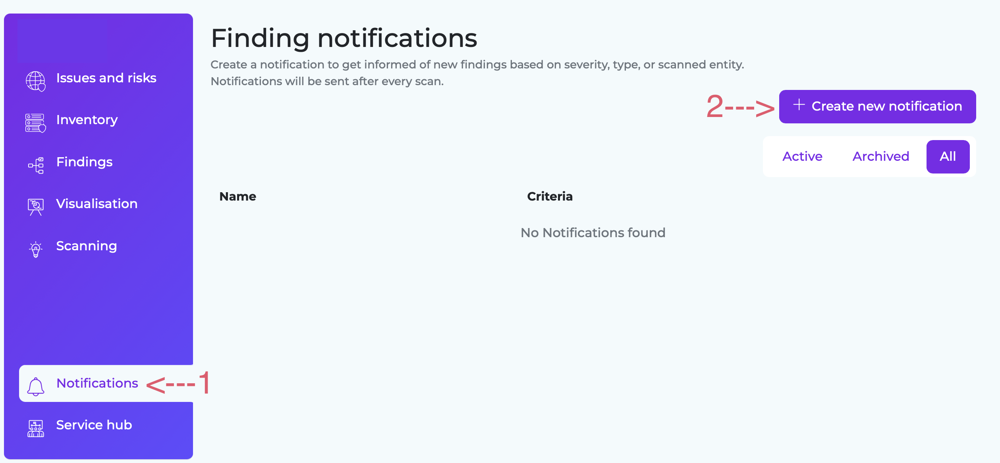
- In your Glasstrail account, click Notifications in the menu sidebar
- Click + Create new notification
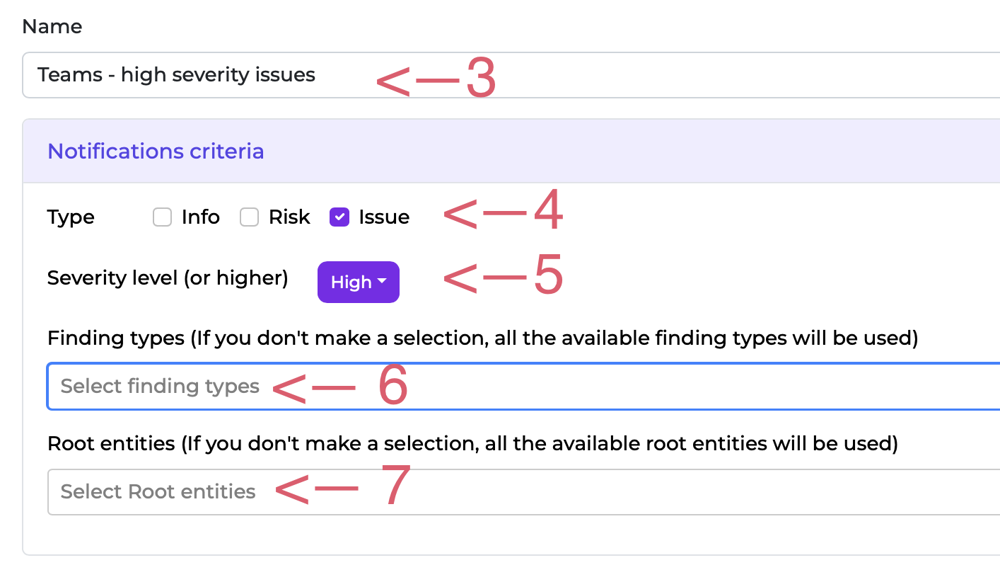
- Give your notification a name
- Select the type of finding you want to get notified about - info/risk/issue
- Select the finding severity level you want to get notified about. If you select "High" you'll get notified about high and critical severity issues. If you select "Medium" you'll get notified about medium, high and critical severity issues.
- Select or start typing to search for the Finding type(s) you're interested in. You can select more than one, or none to get notified about all finding types that meet your criteria
- Select the root entity you are interested in. You may, for example, have a high value asset that you want to get notifications about. Or leave blank to get notified about findings across all of your root entities.
Notification settings
Notifications can be sent via e-mail (simplest), webhook or cURL
Email settings
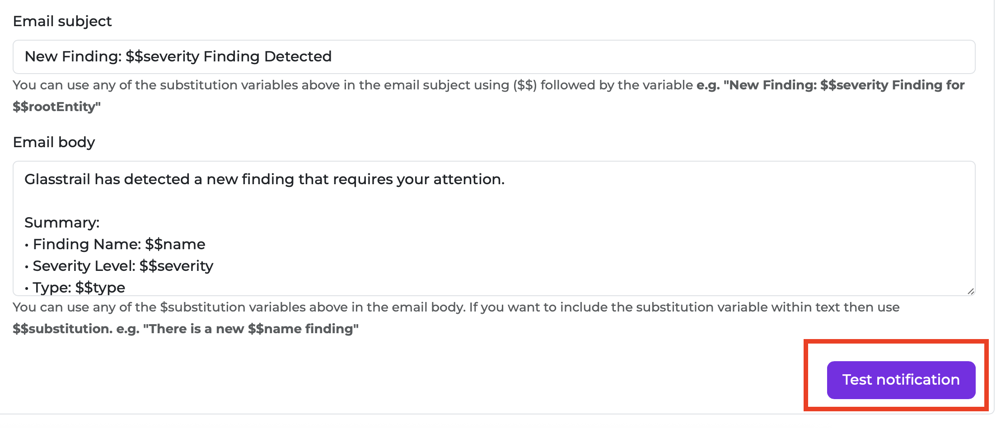
You can specify up to five e-mail addresses to receive e-mail notifications.
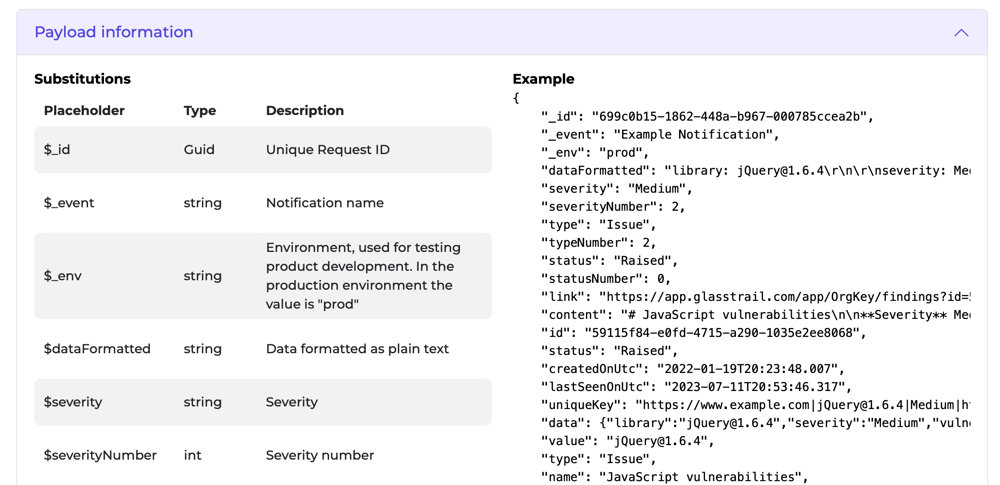
The setup screen lists available variables you can include in your e-mail notification.
Once you have set up your e-mail notification, you can send a test to make sure it includes all the information you need:
Webhook settings
Notifications are sent to your chosen monitoring tool using webhooks.
There are three components to your webhook settings:
Endpoint
This is a URL you'll get from to tool you want to send notifications to.
It might be called different things in different platforms - eg in Slack it's an Incoming Webhook URL
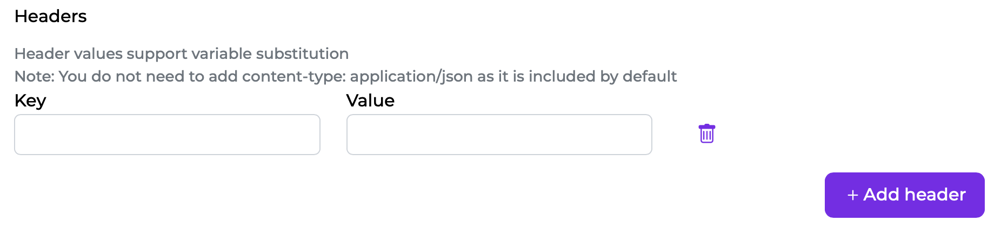
Headers
Headers are additional information sent along with the webhook payload. Some monitoring platforms may require authentication information (ie a key and value) to be sent in the header. Check your monitoring platform for details and specific formats/requirements.
Slack and Teams do not require headers.
Payload
Your webhook payload is the message sent to the monitoring app.
Different platforms have different formats, standards and options for the payload you send.
You can include $substitution variables in your payload - the options for these are listed in the payload information section when setting up a new notification in Glasstrail.
We've included some info below about setting up your incoming webhook for common platforms. If you need help with this or with other platforms, please get in touch.
Get notified on Slack
Prerequisites
- A Slack account and Slack app
- Incoming Webhooks enabled on your Slack app
Create your Slack notification
- Follow steps 1-7 above to create a notification for the findings you're interested in
- In your Slack app, on the Settings page, click the button Add New Webhook to Workspace
- Pick a channel that the app will post to, and then click to Authorize your app.
- You will be sent back to your Slack app settings, and you should see a new entry under the Webhook URLs for Your Workspace section, with a Webhook URL that looks something like
https://hooks.slack.com/services/T00000000/B00000000/XXXXXXXXXXXXXXXXXXXXXXXX. This is the link you should paste in the Endpoint field in Glasstrail. - Set up your Payload template in Glasstrail with any of the information you wish to send. See a simple example below.
- Click Test webhook and make sure the data arrives in Slack as you expect.
Example payload for Slack
{
    "blocks": [
        {
            "type": "section",
            "text": {
                "type": "plain_text",
                "text": "A new $$severity severity $$type has been found on $$rootEntity",
                "emoji": true
            }
        },
        {
            "type": "section",
            "text": {
                "type": "mrkdwn",
                "text": "$$dataFormatted"
            }
        },
        {
            "type": "section",
            "text": {
                "type": "mrkdwn",
                "text": "See full finding details."
            },
            "accessory": {
                "type": "button",
                "text": {
                    "type": "plain_text",
                    "text": "View in Glasstrail",
                    "emoji": true
                },
                "value": "click_me_123",
                "url": "$$link",
                "action_id": "button-action"
            }
        }
    ]
}
For more detailed information, including advanced notification formatting, review Slack's incoming webhooks documentation.
Get notified on Teams
Prerequisites
- A Teams account
- Permission to create, update and remove connectors
Create your Teams notification
- Follow steps 1-7 above to create a notification for the findings you're interested in
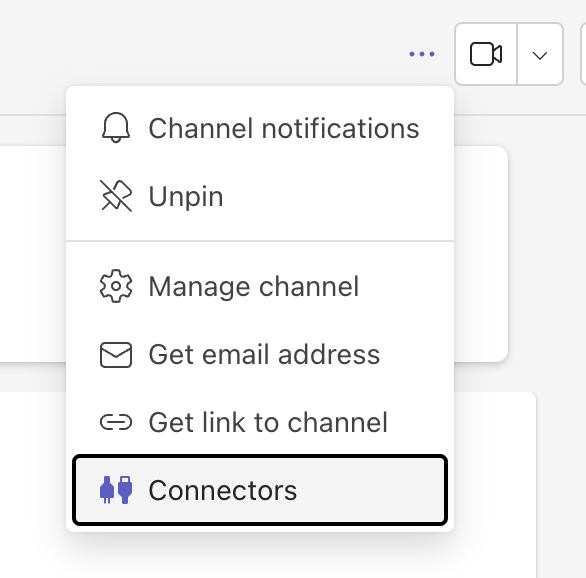
- In the Teams channel where you want to receive notifications, select ••• from the upper-right corner.
- Select Connectors from the dropdown menu.
- Search for Incoming Webhook and select Add
- Select Configure, provide a name, and upload an image for your webhook if necessary
- Copy the unique webhook URL present in the dialog
- Paste this URL into the Endpoint field in Glasstrail
- Set up your Payload template in Glasstrail with any of the information you wish to send (see an example below)
- Click Test webhook and make sure the data arrives in Teams as you expect
Example Payload for Teams
{
"type":"message",
"attachments":[
{
"contentType":"application/vnd.microsoft.card.adaptive",
"contentUrl":null,
"content":{
"$schema":"http://adaptivecards.io/schemas/adaptive-card.json",
"type":"AdaptiveCard",
"version":"1.2",
"body":[
{
"type": "TextBlock",
"weight": "Bolder",
"text": "New $$severity severity $$type on $$rootEntity. [View finding detail]($$link)",
"wrap": true
},
{
"type": "TextBlock",
"text": "$$dataFormatted",
"wrap": true
}
]
}
}
]
}
For more detailed information, including advanced notification formatting, review the Teams Incoming Webhooks documentation.
Get notified on Splunk
On Splunk, use the HTTP Event Collector to setup your inbound notification.
Prerequisites
- A Splunk account
Create your Splunk notification
- Follow steps 1-7 above to create a notification for the findings you're interested in
- In Splunk, create an Event Collector token. Steps to do this are documented here
- Once you've created your token, copy the displayed token value, and paste it into the Headers: Key field in your Glasstrail notification
- Add Authorization: Splunk to the Headers: Value field per Splunk docs
- Follow the instructions here to generate your HTTP Event Collector URI. Paste this URI into the Endpoint field in Glasstrail. This will look something like:
https://mysplunkserver.example.com:8088/services/collector/event
- Set up your Payload template in Glasstrail with any of the information you wish to send. See Splunk documentation for formatting information and examples
- Click Test webhook and make sure the data arrives in Splunk as you expect.
Get notified on other platforms
Zapier, Power Automate, Make, Pipedream and more support webhooks as a trigger to connect to other systems.
Need help using webhooks with other platforms? Get in touch